How to Calibrate Gages and Certify Calibration Programs
Tips for establishing and maintaining a regular gage calibration program.
#qualitygagingtips #Basics
Choosing the Correct Gage Type for Groove Inspection
Grooves play a critical functional role for seal rings and retainer rings, so good gaging practices are a must.
#qualitygagingtips
Calling Home on a Portable Surface Gage
Today’s surface gages have a user interface that is just like a smartphone, and setting them up to make measurement requirements should be easy for the operator.
#qualitygagingtips
How to Choose the Correct Measuring Tool for Any Application
There are many options to choose from when deciding on a dimensional measurement tool. Consider these application-based factors when selecting a measurement solution.
#Basics #qualitygagingtips
Bring the Surface Finish Check to the Part
Dedicated handheld gages can assist the operator in making critical checks.
#qualitygagingtips
Reading What the Dial Indicator Is Saying
Dial indicators provide good value for their resolution. With a glance, one can quickly determine if the part is larger or smaller than the master setting and by a degree of how much.
#qualitygagingtips
Performance Digital Comparators Offer an Alternative to Bench Amplifiers
Electronics today allow for matching the linear variable differential transformer performance and digital indicator size into a new digital comparator that provides even more value than traditional bench amplifiers.
#qualitygagingtips
Determining Out-of-Roundness at the Point of Manufacture
George Schuetz, Mahr Inc.’s Director of Precision Gages, offers these techniques for measuring roundness on the shop floor.
#qualitygagingtips
Sensitive and Strong: Advanced Digital Comparators
Borrowing from cell phone touchscreen technology, user interfaces on industrial gages are increasingly sensitive — and strong.
#qualitygagingtips
How to Choose the Right Cut Off When Measuring Roughness
Measurement results for surface finishing parameters can vary depending on the filter parameter (Lc), also known as the cutoff.
#qualitygagingtips #Basics
How To Calibrate Your Calipers
If you’re interested in calibrating your own digital, dial or Vernier calipers, here are some steps to take to make sure it goes off without a hitch.
#qualitygagingtips #Basics
When Manufacturers Should Use 3D Measurement for Surface Finishing
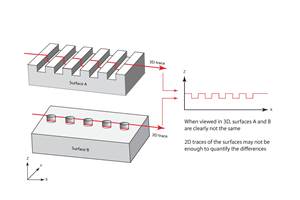
Two-dimensional (2D) surface profiling systems are the standard for quality assurance in manufacturing, but some applications demand 3D measurement systems.
#Basics #qualitygagingtips
What Manufacturers Need to Know About Metrology
As manufacturing technology advances, measurement processes evolve to stay one step ahead.
#qualitygagingtips #Basics
Differential Gaging: 2 Big Benefits for In-Process Part Control
Differential gaging offers benefits like reducing operator influence and enabling quick in-process checks.
#qualitygagingtips
How to Improve Comparator Stand Performance for Gaging
Adding digital display systems and high-precision probes to comparator stands brings new functionality and pitfalls. The right setup can minimize errors.
#Basics #qualitygagingtips
How to Choose the Right Dial Indicator
Digital alternatives are replacing dial indicators – but dial indicators can still be useful. Here’s how to select the right one for a given application.
#qualitygagingtips #Basics
How to Correctly Measure Surface Finish
When providing surface finish specs, engineers sometimes leave out the actual testing parameters. Here’s how to be sure measurements are as accurate as possible.
#Basics #qualitygagingtips
The Right Gage for Measuring Small Bores
Small bore holes present a unique set of challenges for precision measurement, but small mechanical bore gages can be used for tight tolerances in this application.
#qualitygagingtips #Basics
Test Indicators Excel for Tight Tolerances and Small Spaces
Test indicators are sometimes overlooked or replaced by dial or digital indicators, but for some situations, they can’t be beat.
#qualitygagingtips
Vibration: An Invisible Source of Gaging Error
Vibration can make or break a gage’s performance, but vibration errors can be resolved by using a vibration isolation table or other correction measures.
#qualitygagingtips


